If you haven't read it yet, we recommend you review the following KB article which provides an overview of 3Essentials spam protection mechanisms, and explains how training the spam filtering fits into the overall 3Essentials spam protection strategy: Spam Protection: Overview of 3Essentials Spam Protection
This article describes how to enable Spam Free Trusted Mail*, available to customers who have our most recent plan versions which are hosted on servers web12, web14, and web16. Once you've completed reading this article, it's recommended your review the following articles which discuss other weapons available to you to customize your spam fighting arsenal:
Proceeding with the discussion of Spam Free Trusted Mail...
For the ultimate in spam protection, 3Essentials offers Spam Free Trusted Mail*. Enabling this protection guarantees you virtually 100% protection by ensuring you only receive email from those you have previously approved to send you mail. Basically, this protection works by allowing you to pre-define a list of people that can send you mail, and then we only accept mail for you from those senders - we call those mail users Trusted Senders.
- Trusted senders may be specified as an individual mail user (john@john.com) or an entire domain (i.e., any mail sender from @MyBank.com).
- Configure a single Trusted Senders list for all mail users on your domain(domain-wide) or let each of your mail users create their own Trusted Senders list:
- A domain-wide Trusted Sender list uses a single trusted sender list for all mail users on your domain.
- A user-specific Trusted Sender list allows each user configures their own list of trusted senders.
- (you cannot use both, if domain-wide is enabled, it overrides user-specific lists).
- Chose what action you want for mail received from senders not on your list - you can delete it, modify the header it, put it into a special folder, etc.
*Note this feature is not available on linux hosting plans or on Windows hosting plan versions which are hosted on the following Windows servers: web2, web4, web6, web8, and web10. If you are hosted on one of these servers, and wish to use this feature, contact support today about updating your hosting plan to a current hosting plan which supports this feature. In most cases, updating to a current plan which supports this feature does not involve any additional costs.
To enable Spam Free Trusted Mail:
- In general, to enable this feature, we'll perform 4 steps
- log into the mail interface (logging in will vary based on whether you're doing domain-wide or user-specific Trusted Sender lists).
- Create and populate a list of Trusted Senders.
- Created a rule to allow mail from Trusted Senders
- Created a rule to delete (or otherwise handle) all mail from people who are not a Trusted Sender
- The first step is to get logged into the mail administration interface, but how you do this will depend on whether you want to enable a domain-wide Trusted Senders list or a user-specific trusted senders list:
- Remember, you can't use both, you must either use a domain-wide Trusted Sender list OR a user-specific Trusted Sender list.
- If you want to enable a domain-wide Trusted Sender list:
- Log into your control panel
- Don't know how to access your Control Panel? Read article: Where do I find my Control Panel?
- Note, only account holders have access to the Control Panel, so only account holders will be able to log into the control panel to configure a domain-wide Trusted Sender list.
- Click on your domain name
- Click on the MAIL icon
- For added security, you will be prompted to log in again with your Control Panel username and passord.
- Click the MANAGE icon/button to manage mail for the domain, and the SmarterMail mail administration interface will load, and show you logged in as adminXXXXXX.
- If you want to enable a user-specific Trusted Sender list:
- The email user must already be created.
- Access your webmail interface at http://webmail.yourdomain.com where yourdomain.com is your actual domain name.
- log in using the full email address (user@yourdomain.com) and corresponding password.
- When using user-specific Trusted Sender list, each user will need to log in and follow these steps to enable Spam Free Trusted Mail with their own Trusted Sender list.
- Now that you're logged into the mail administration interface, the next step is to create your list of Trusted Senders - From the SETTINGS (or DOMAIN SETTINGS) pulldown, click SPAM FILTERING (or DOMAIN SPAM FILTERING).
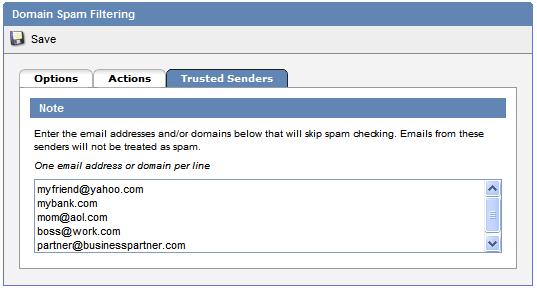
- On the SPAM FILTERING settings, click the TRUSTED SENDERS tab.
- Populate the TRUSTED SENDERS tab with the email addresses and domains you wish.
- one entry per line
- lists email address in this format: user@domain.com
- list domains as: domain.com (example: mybank.com), this would allow mail from any user from the mybank.com domain.
- you can come back and update this list at any time and as often as you like - changes are implemented immediately.
- Be sure to click SAVE after you've populated the list of TRUSTED SENDERS.
- Now that you've provided a list of TRUSTED SENDERS, we need to implement a rule to allow/accept mail from people that are on the TRUSTED SENDERS LIST. To do so, from the SETTINGS / DOMAIN SETTINGS pulldown, click on CONTENT FILTERING (or DOMAIN CONTENT FILTERING).
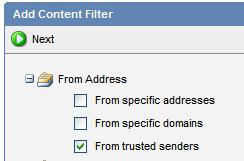
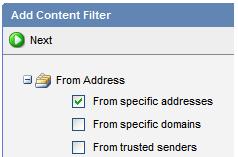
- On the CONTENT FILTERING page, click ADD FILTER.
- Select/check the FROM TRUSTED SENDERS, anc click NEXT...
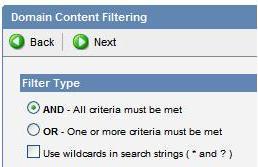
- Leave FILTER TYPE set to AND and click NEXT...
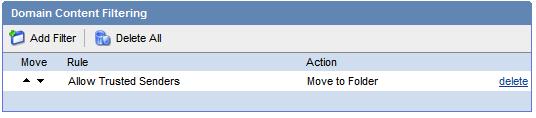
- For RULE NAME, enter "Allow Trusted Senders", and for ACTIONS check the MOVE MESSAGE TO FOLDER option and enter "Inbox" as the folder name:
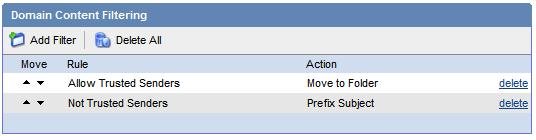
- Click SAVE to save this rule. You should then be taken back to the Domain Content Filtering page, and it should list the rule you just completed:
- Next we configure a rule to block (or any action you wish) all other mail. Click ADD FILTER to add a second filter/rule.
- Select/check FROM SPECIFIC ADDRESSES, click NEXT.
- On this page:
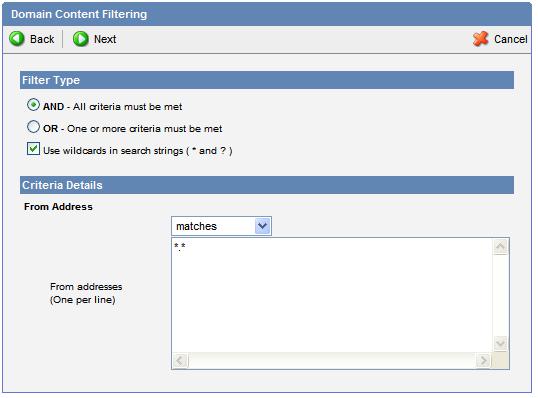
- Leave FILTER TYPE set to AND
- Check/enable the option for USE WILDCARDS IN SEARCH STRINGS.
- And then enter *.* into the text box for FROM ADDRESSES.
- And then click NEXT... (should look like this)
 - For the RULE name enter "Not Trusted Senders", and for the ACTIONS, set the action to the action you desire, observing these important notes about the available options...
- DELETE MESSAGE: Most users typically want to select "DELETE MESSAGE". This makes it a clean choice... mail from Trusted Senders is accepted, mail from everyone else is deleted.
- BOUND MESSAGE: DO NOT select "Bounce Message". Bouncing messages causes excessive and unnecessary mail traffic. 3Essentials is unable to remove this option from SmarterMail, so the policy is enforced via notification in this article. If you are found to have enabled bouncing of messages for *.* senders, you will be contacted by 3Essentials to change this setting.
- MOVE MESSAGE TO FOLDER: You can chose to MOVE MESSAGE TO FOLDER to move these messages to a folder (like say, "junk mail" or "not trusted") , but please note, that this means a folder on your webmail interface. This option is intended for those users who use only webmail for accessing their mail - webmail keeps all mail on the server, and "move to folder" means move to a webmail folder. If you're using Outlook/Outlook Express or some other mail client which uses POP to download the mail to your computer, and you want messages moved into a specific folder within your mail client (like Outlook/Outlook Express), this can be done. To do so, chose the option to "embed header line into message", and then configure a rule in your mail client to look for this header line, and take the corresponding action (put into a folder on your mail client). What you put in the header is really not important, as long as it's unique... like "3e-not-trusted"... then see your mail client's help/documentation on how to set a rule in the mail client to search for "3e-not-trusted" in mail headers and move to a folder within the mail client.
- PREFIX SUBJECT WITH COMMENT: this works just like it sounds... maybe you want to receive these mails from people not on your Trusted Senders list, but you want to tag the subject with "NOT TRUSTED".
- EMBED HEADER LINE: See the note on "move message to folder" above.
- COPY MESSAGE or REROUTE MESSAGE: We do not recommend you chose either of these options for mails from *.* (i.e., anyone not on your Trusted Senders). This will lead to excessive and unnecessary mail traffic. If you enable this option, and excessive email traffic results, 3Essentials will contact you to modify your settings accordingly.
- In our example, shown in the next image, I'm configuring it so that any mail from someone who is not a trusted sender will simply have the SUBJECT of the email updated with the words "NOT TRUSTED:". I.e., if a mail came in from someone not on my Trusted Senders list, and the subject was "Buy my book", the mail would still be delivered to me, but the subject would be changed to "NOT TRUSTED: Buy my book".

- Once you click SAVE, your should be taken back to the primary CONTENT FILTERING screen and both rules should now show:
- You are now done... you have successfully:
- Made a list of Trusted Senders.
- Created a rule to allow mail from Trusted Senders
- Created a rule to handle all mail from people who are not a Trusted Sender
- PLEASE NOTE the important items:
- You'll notice the content filters have a MOVE icon which allows youto change order of the rules... the rules MUST be in the order specified in this article.. do NOT change/move the order of the rules.
- Explanation: Content Filtering works by taking the action of the first matched rule... so if you put the "not trusted senders" rule first, it would match all email as "*.*", and therefore all email would have that action applied (including Trusted Senders). After a rule is matched, an email is not compared to any other rules, just the first rule that it matches the criteria.
- These changes take effect immediately, and you can come back to make changes at any time.
- All mail still passes through the 3Essentials Enterprise Spam Filtering, and may be blocked even if on your Trusted Senders. For instance, if the mail is found to have a virus, we would still block it.
|
 KB
KB